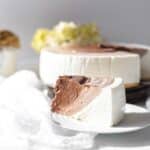
Chocolate Ripple No Bake Keto Cheesecake Recipe
Enjoy our Chocolate Ripple No Bake Keto Cheesecake Recipe without crust as a healthy alternative whenever sweet cravings arise. This low carb no-bake cheesecake is an easy keto dessert you can whip up quickly.
Servings 8
Calories 164kcal
Equipment
Ingredients
- 5 Cups Greek Yoghurt
- 12 Sheets Gelatine
- 2/3 Cup Heavy Cream
- 5 Tablespoons Cocoa
- 3/4 Cup Sweetener
- 2 teaspoons Vanilla Essence
Instructions
- To make the cheesecake, prepare all ingredients in advance.
- Depending on the gelatine you will use, prepare it in advance. Heat your heavy cream on the stove or microwave and pour it into the jar you will mix with gelatine.
- Add gelatine or gelatine sheets into the jar, and mix it thoroughly with heavy cream with your hand blender.
- Place it on the side.
- To make the filling, take a big bowl filled with yogurt and add the sugar sweetener of your choice. Hand mix the powdered sugar into the yogurt first ( so it does not dust your whole kitchen) and switch on your hand mixer. Mix fully. Slowly add the heavy cream gelatine mixture to the yogurt and keep mixing. Ensure the mixture is not hot; otherwise, your yogurt will become very liquid.
- In this step, you can prepare three different jars big enough for your hand mixer to fit. If you will use the exact measurements of our yogurts, place 1,5 cups into the biggest jar—3/4 of a cup of yogurt into the second jar and half a cup into the smallest. Next to it, prepare a bowl with half a tablespoon of cocoa for the biggest jar, two tablespoons for the middle, and 2 1/2 tablespoons for the smallest jar.
- When all three of the jars are filled, pour the rest of the remaining yogurt mixture into your prepared baking form.
- Add cocoa inside each jar, and with your hand mixer, start mixing it. You should be able to whip up three different colors of brown. The biggest jar should have the lightest color, and the smallest one should have the darkest color.
- Once the jars are thoroughly mixed and you are satisfied with the colors, we can start pouring and making the ripple design. Take the baking form with the white yogurt insight and start with the lightest brown color. Pour it slowly on top of the white yogurt directly into the middle. Do not shake or touch or move. Just pour all the mixture into the center. Once the first mixture is poured, take the second one and start pouring again into the middle of the baking form. Follow the last step the same way and pour the darkest brown into the middle. In this step, the last parts are getting too thick to pour. Place it into the microwave for a few seconds, and the mixture should liquidize again.
- To help the bubbles disappear and let the cake set a bit, slightly bang the whole cake against the table. Make sure the colors will not mix. Check the video for a better understanding. Gently lift from the table and refrigerate the cheesecake to cool down for at least 5 to 8 hours, best overnight.
Video
Notes
- Cake Form – My calculations started with the cake form I used. Because the only medium-sized baking form I had was the one that fits into our 6-inch Instant Pot, that is the one I have used. You can use any other baking dish you have. If wider, your cake will be with a bit less height, but still awesome.
- Video Recipe – If there are some steps you are unsure of, please check our video instructions for better understanding.
- Thickening – If you realize your mixture is already getting thick and challenging to pour, place it into the microwave for a few seconds, and it will liquidize again.
- Coloring – If by any chance two of the colors are very similar, add a bit more yogurt to make it lighter or add more cocoa to make it darker, so all three shades look different brown.
- Dairy Free – You can swap heavy cream with coconut cream and yogurt with coconut or almond yogurt.
Nutrition
Serving: 1g | Calories: 164kcal | Carbohydrates: 3g | Protein: 17g | Fat: 8g | Saturated Fat: 5g | Polyunsaturated Fat: 0.3g | Monounsaturated Fat: 2g | Trans Fat: 0.01g | Cholesterol: 29mg | Sodium: 57mg | Potassium: 245mg | Fiber: 1g | Vitamin A: 297IU | Vitamin C: 0.1mg | Calcium: 158mg | Iron: 1mg