
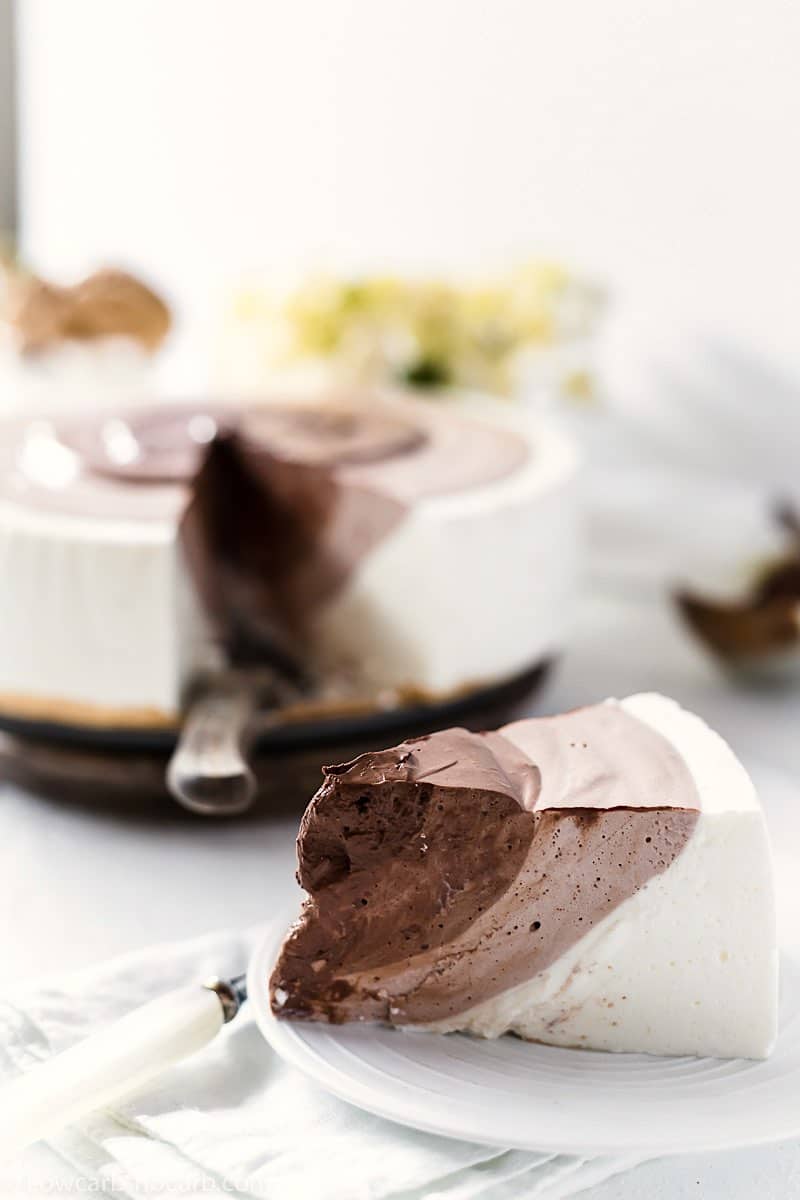
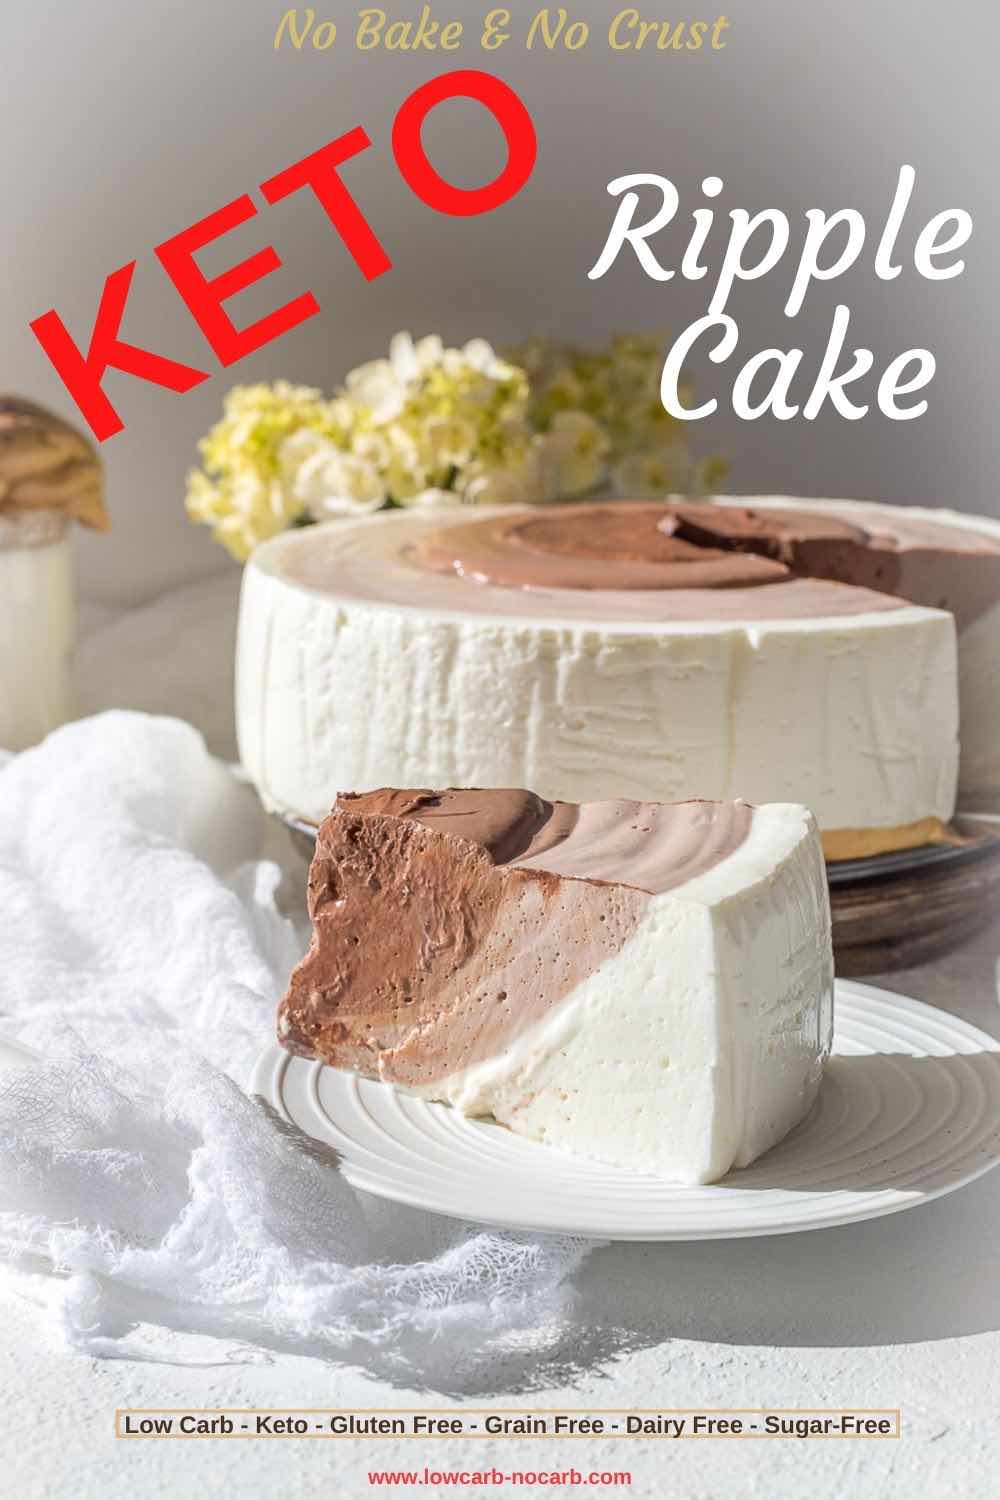
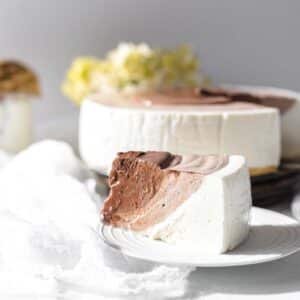
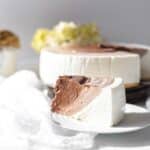
Enjoy our Chocolate Ripple No Bake Keto Cheesecake Recipe without crust as a healthy alternative whenever sweet cravings arise. This low carb no-bake cheesecake is an easy keto dessert you can whip up quickly.

With our recipe, this dessert is so fail-proof that you do not have to be afraid even to make it for someone’s birthday, transport it or let it outside in the garden for a while. Nothing will happen. It will stay put for a long time.
Our mini cheesecake bites or delicious bird’s milk jello cake would be a great addition to the gelatine recipes.
Quick and Easy Keto Dessert
- No-Bake
- No-Crust
- No-Eggs
You can prepare it in about 15 min.
This fail-proof no-bake cheesecake recipe is quick and easy, especially during summer when no oven is wanted. This sugar-free and low-carb cheesecake recipe feels like you have just gotten 4 different keto desserts in one go. Entirely gluten-free, grain-free, and without needing any eggs at all.
Best Keto Cheesecake 4 in 1
With:
- Four different flavors
- Four different tastes
- Four different cakes
All of those in one super quick and easy keto cheesecake recipe to make.
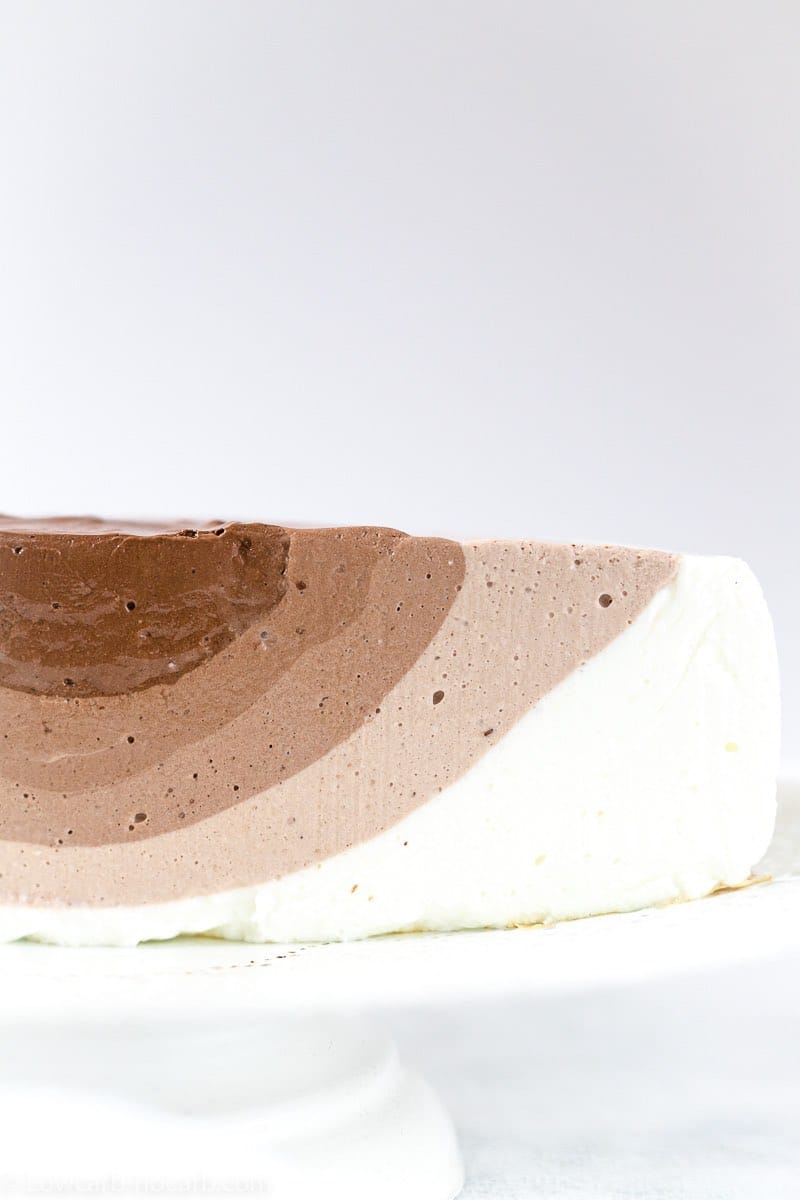
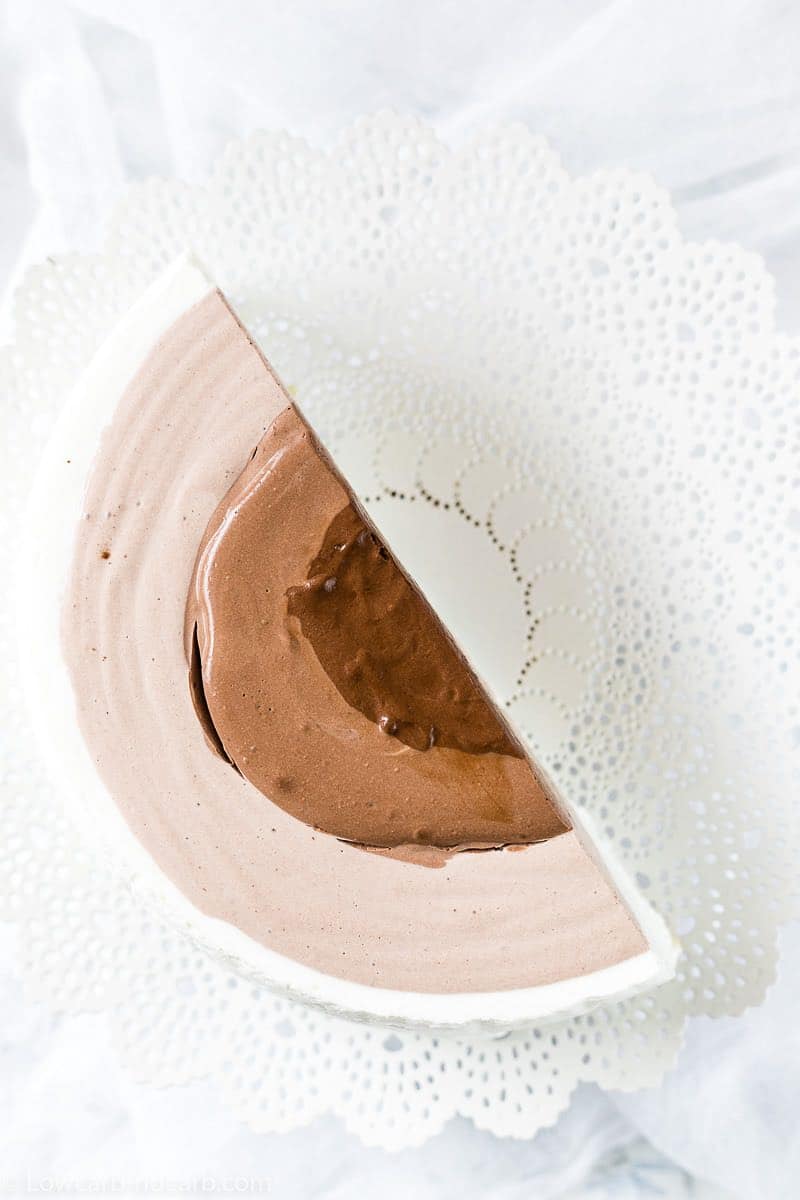
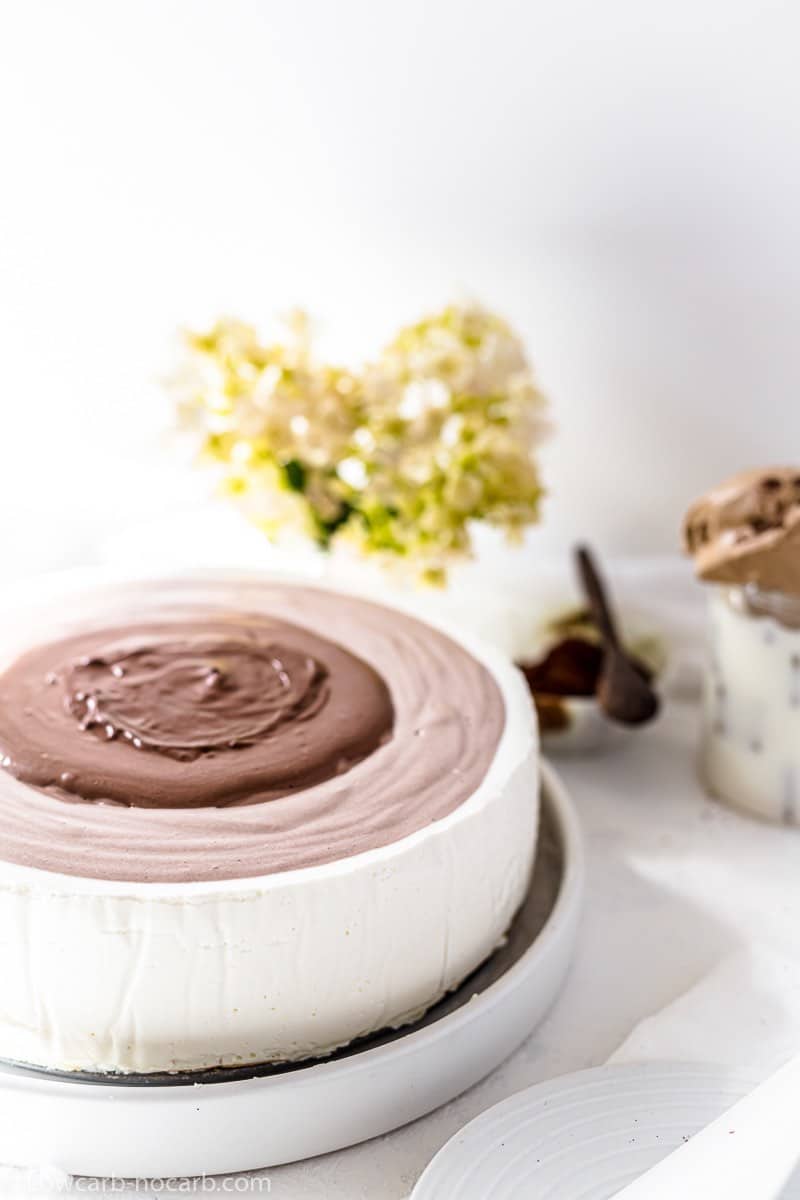
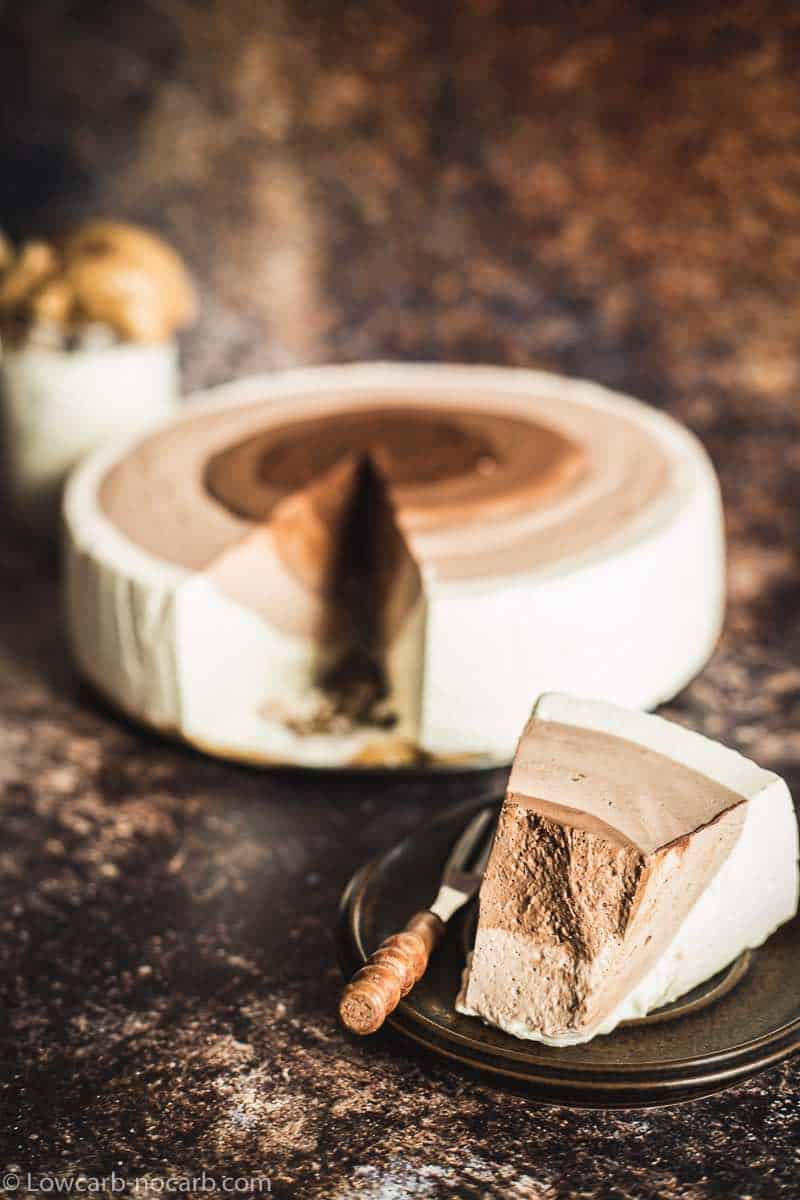
This best easy, no-bake, no, crust yogurt chocolate ripple keto cheesecake is just DIVINE.
Keto No-Bake Cheesecake
It is as if you are serving four different varieties of healthy cheesecakes.
- The white is super mild with a sour base.
- Light brown has a touch of chocolate feeling and hints of sourness.
- The third layer is like a perfectly smooth chocolate mousse.
- The fourth and last part is a pure deep chocolate keto pudding you crave.
Sugar-Free Yogurt Keto Cheesecake
This recipe idea came to me during our extended 2-month stay in the house.
Why Use Yogurt Instead of Cream Cheese for a Cheesecake?
We have only used pre-orders for our grocery shopping, and delivery was once a week. I ordered Greek yogurt in the first two weeks, but it never came.
In the 3rd week, I ordered three different 1kg containers of various Greek yogurt brands with the hope that one would be available and I would have some starter for making my Greek yogurt in an Instant Pot.
And guess what?
All 3 kilos came. The 4th week was the same scenario since I had to pre-order two weeks in advance. So all we did was eat and cook with yogurt.
I made everything possible but still was left with 3 kilos of it.
And since most of the cheesecakes I make contain yogurt instead of cream cheese or sour cream, I went to do some experiments there.
I have seen those swirl cakes and ripple cakes on the net quite a few times and have always promised to try to make them in the keto or low-carb version. And this day has come.
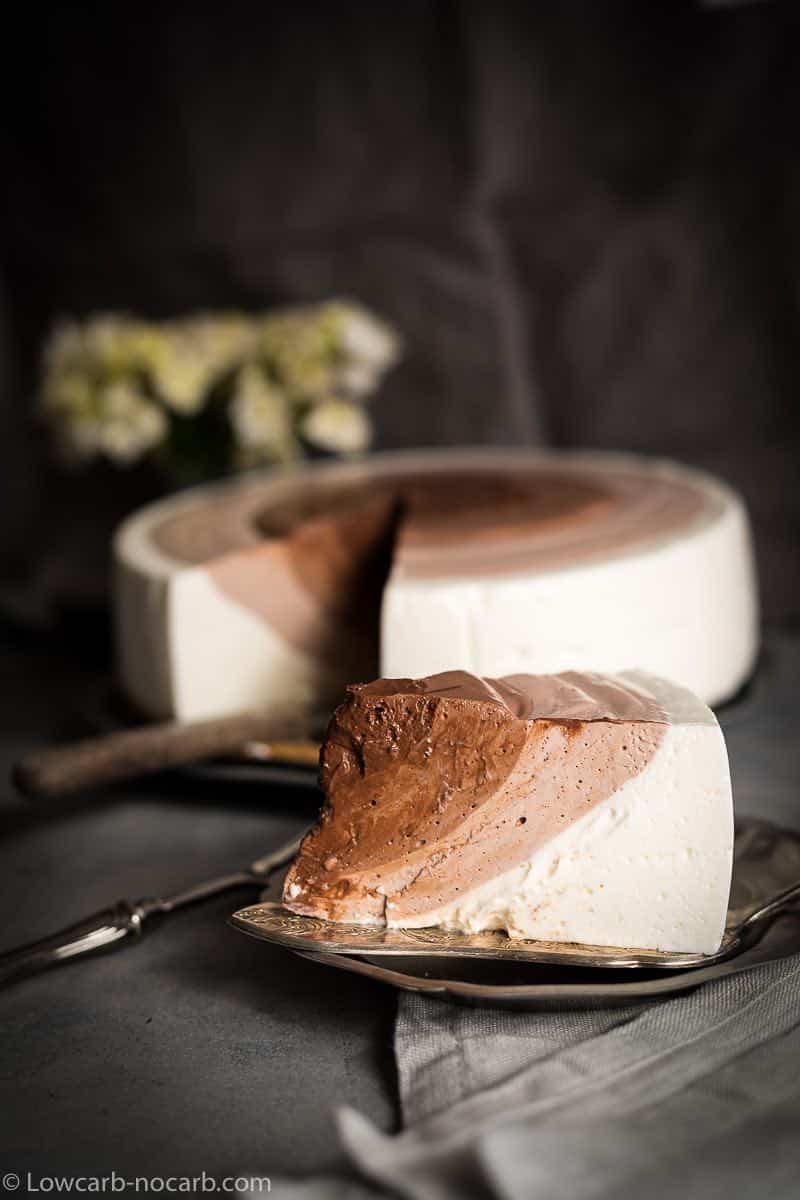
Keto Ripple Cheesecake
It has been an extreme success.
I have already made a few cheesecake recipes, you can check in our cakes section, but there are always more of them.
As an additional idea, I made this cheesecake using wild frozen blueberries instead of cocoa for my daughter’s Birthday, and the cake was out of this world.
The next plan is to make this into a pumpkin cheesecake.
This keto recipe is definitely a keeper as it is super easy to make and an excellent replacement for a traditional no bake cheesecake without the crust.
I love this recipe to bits.
Keto No Bake Cheesecake With Gelatine
I have decided to add gelatine to our cheesecake because of no crust. I did not want to have a fail for some of you, who might get more liquidy yogurt that will never set.
Plus, we all need a bit of extra collagen. Don’t we?
What Is the Carb Content in Keto Chocolate Ripple Cheesecake?
Since this super yummy no-bake cheesecake does not contain any base or crust, not even almond flour, your carbs are even less than expected, just right for the keto diet.
I calculated all in MyfitnessPal and divided the whole cake into eight portions. It surprised me into a perfect 3 grams of carbohydrates per portion with 1 gram of fiber.
Isn’t that fabulous?
If you are in to make the crust, any cheesecake crust will work, whether it is coconut flour or almond flour crust, keto graham cracker crust, or mixed nuts crust. Crust ingredients do not matter in this recipe as you use it as a cake base and should not affect your cake.
How To Make No Bake Keto Cheesecake Recipe
Let us go and make this super triple ripple cheesecake.
Kitchen Gadgets You Might Need:
- Cake Form
- Big Glass Bowl
- Hand Mixer
- Three extra jars, where you can mix with a hand mixer
- Parchment Paper
Cheesecake Ingredients Needed:
- Greek Yogurt
- Gelatine
- Heavy Cream
- Sugar Substitute
- Cocoa
- Vanilla Extract
*Exact measurements are listed in the recipe card below.
And as our loyal readers, Wholesome Yum Foods has been so kind to offer to all of our subscribers 10% of ALL of their PRODUCTS using our Coupon Code:
STEP-BY-STEP INSTRUCTIONS FOR RIPPLE KETO CHOCOLATE CHEESECAKE
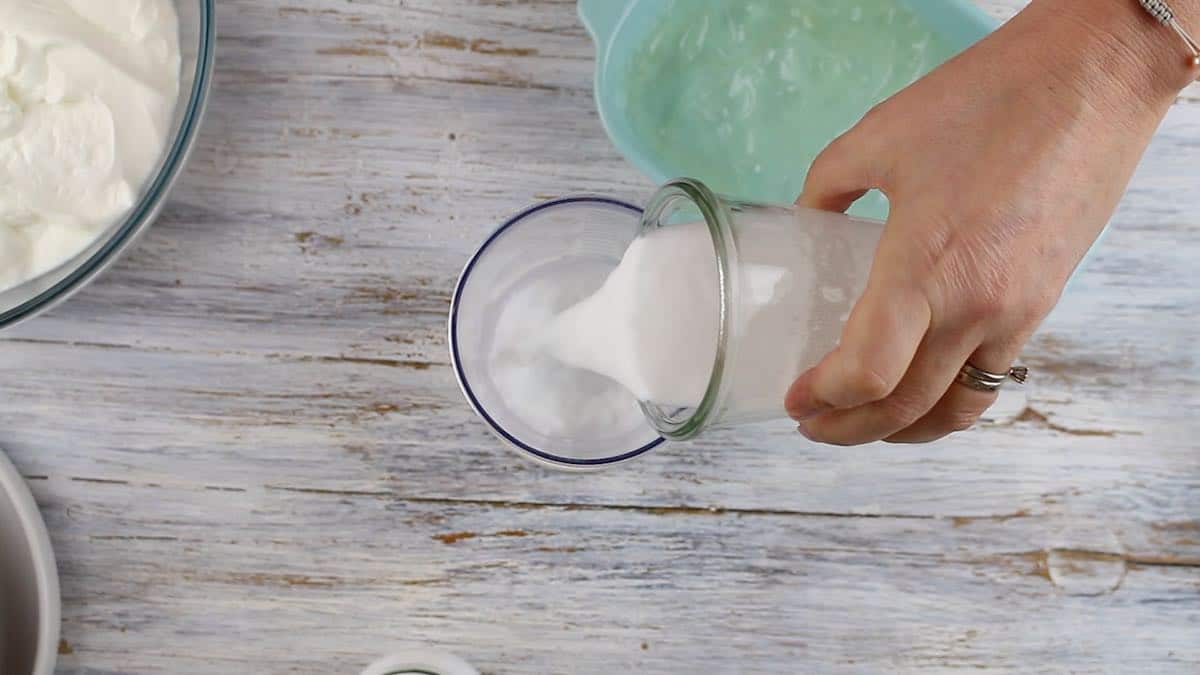
First Step: Prepare Ingredients
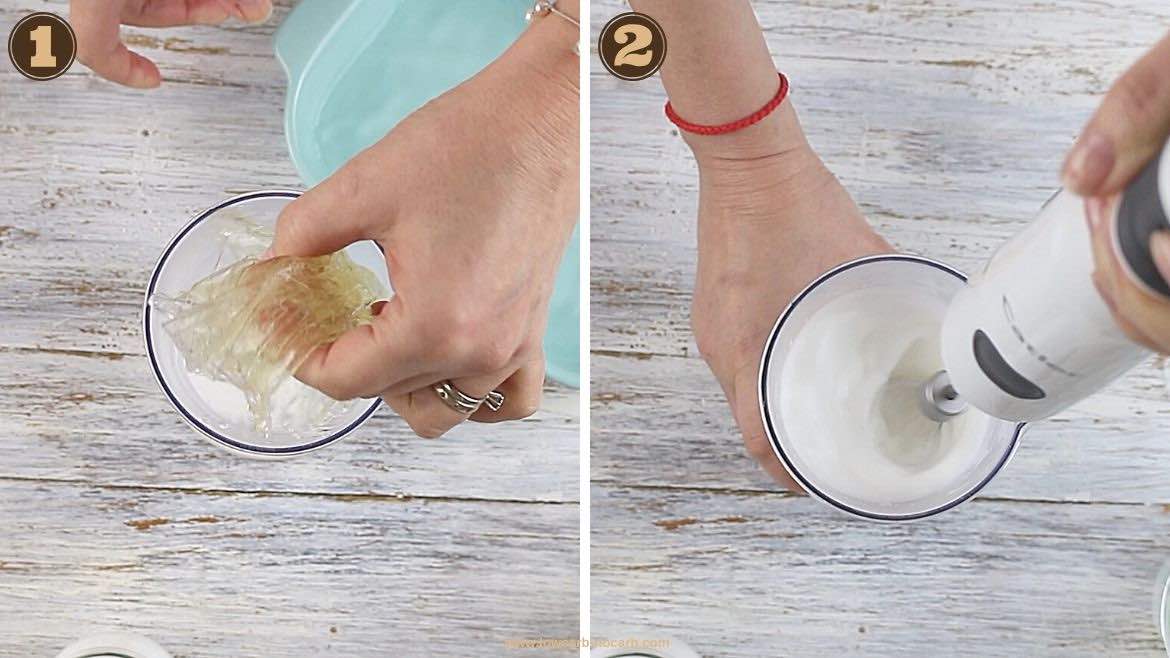
To make the cheesecake, prepare all ingredients in advance. I have used gelatine sheets, but you can use your preferred one. Whether you use monk fruit, allulose or any other sweetener, make sure it is powdered.

Second Step: Warm Up Heavy Cream
Depending on the gelatine you will use, prepare it in advance. I used gelatine sheets in this recipe, so I had to soak them for a few minutes beforehand.
Heat your heavy cream on the stove or microwave and pour it into the jar you will mix with gelatine.
Third Step: Gelatine Soak and Mix
Add gelatine or gelatine sheets into the jar, and mix it thoroughly with heavy cream with your hand blender.
Place it on the side.
Fourth Step: Yogurt Keto Cheesecake Filling
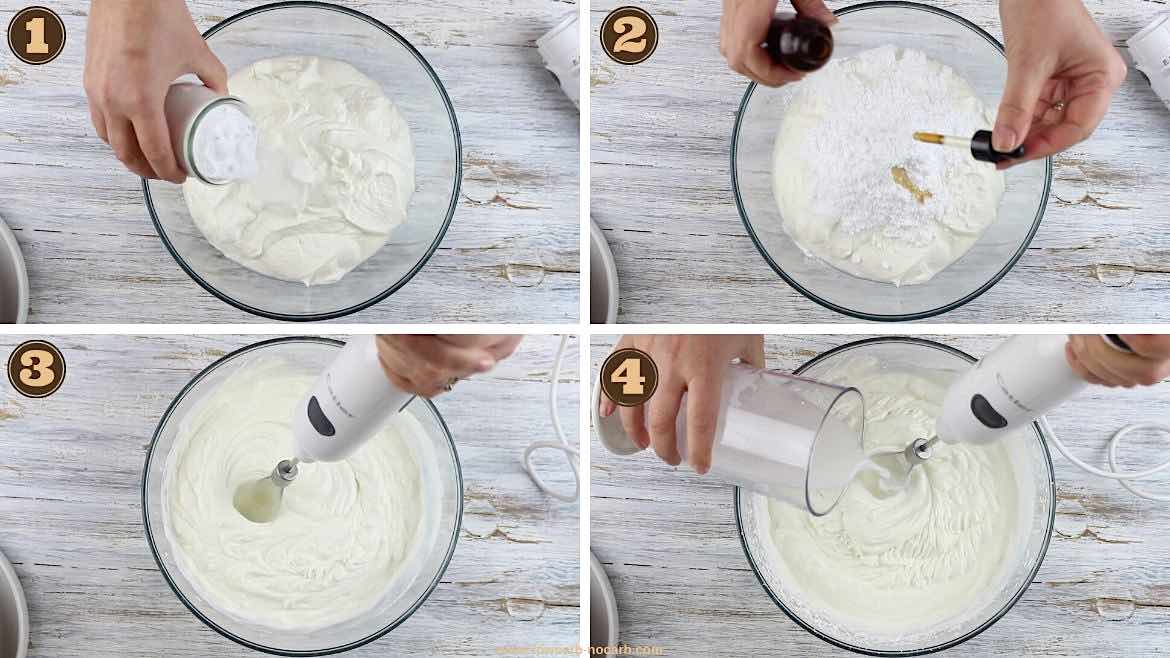
To make the filling, take a big bowl filled with yogurt and add the sugar sweetener of your choice. I always use powdered sweeteners for all of my desserts. If I buy granulated, I mix it in my magic bullet or coffee grinder.
Hand mix the powdered sugar into the yogurt first ( so it does not dust your whole kitchen) and switch on your hand mixer. Mix fully.
Slowly add the heavy cream gelatine mixture to the yogurt and keep mixing. Ensure the mixture is not hot; otherwise, your yogurt will become very liquid. I like to pour it slowly, step by step while mixing it all.
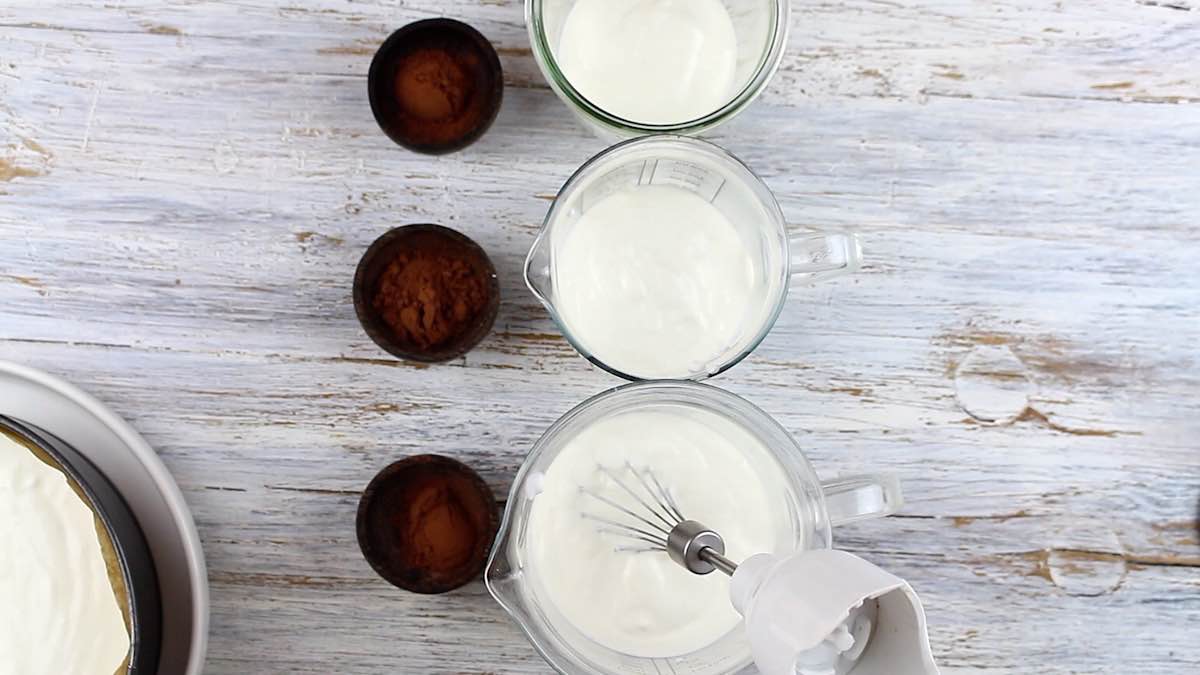
Fifth Step: 3 Jars Plus 3 Cocoa Bowls
In this step, you can prepare three different jars big enough for your hand mixer to fit.
This step will be a little complicated to explain, but once you get it, it is straightforward.
You can also look at the video for better explanations and understanding.
If you will use the exact measurements of our yogurts, place 1,5 cups into the biggest jar—3/4 of a cup of yogurt into the second jar and half a cup into the smallest.
Next to it, prepare a bowl with half a tablespoon of cocoa for the biggest jar, two tablespoons for the middle, and 2 1/2 tablespoons for the smallest jar.
Sixth Step: Pour the Rest to the Baking Form
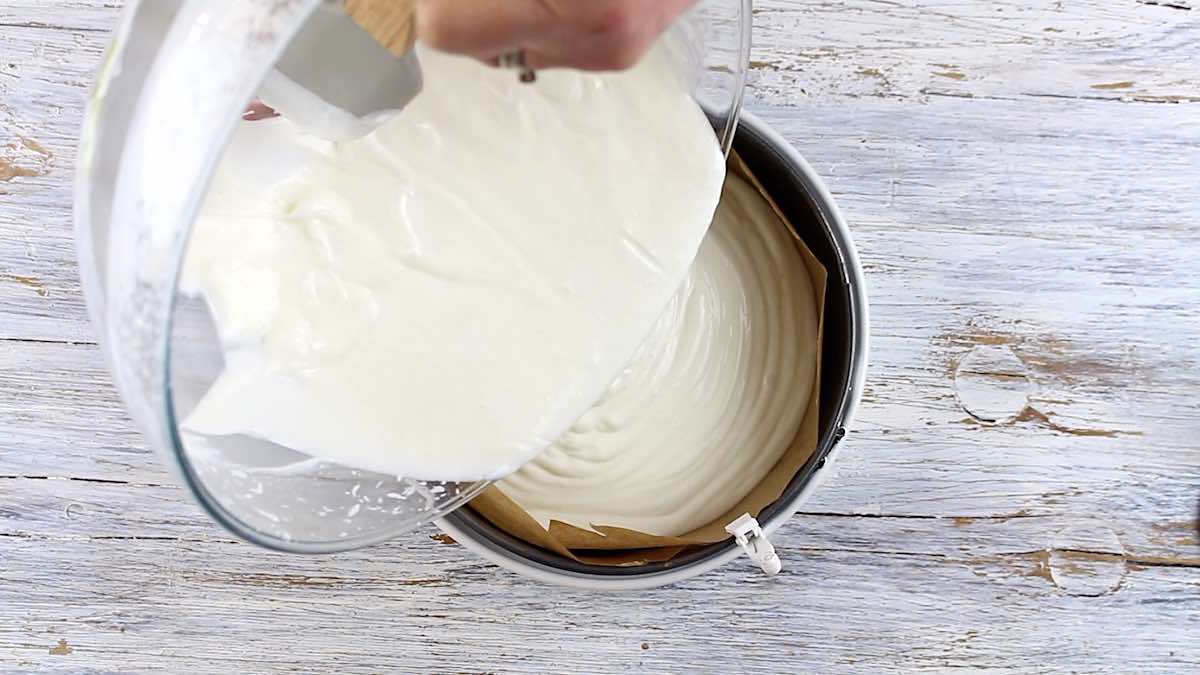
When all three of the jars are filled, pour the rest of the remaining yogurt mixture into your prepared baking form.
I have layered the form with parchment paper for easier dismantling at the end.
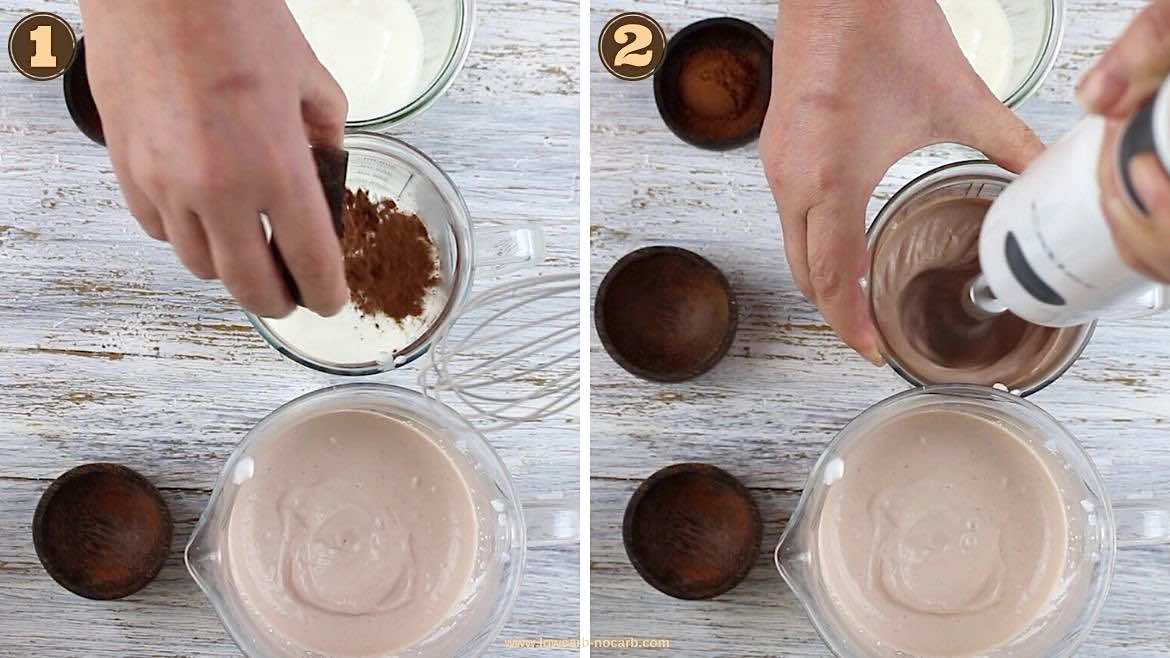
Seventh Step: Mix in Cocoa Inside 3 Jars
Add cocoa inside each jar, and with your hand mixer, start mixing it. You should be able to whip up three different colors of brown. The biggest jar should have the lightest color, and the smallest one should have the darkest color.
If, by any chance, two of the colors are very similar, then either add a bit more yogurt to make it lighter or add more cocoa to make it darker, so all three colors look different brown.
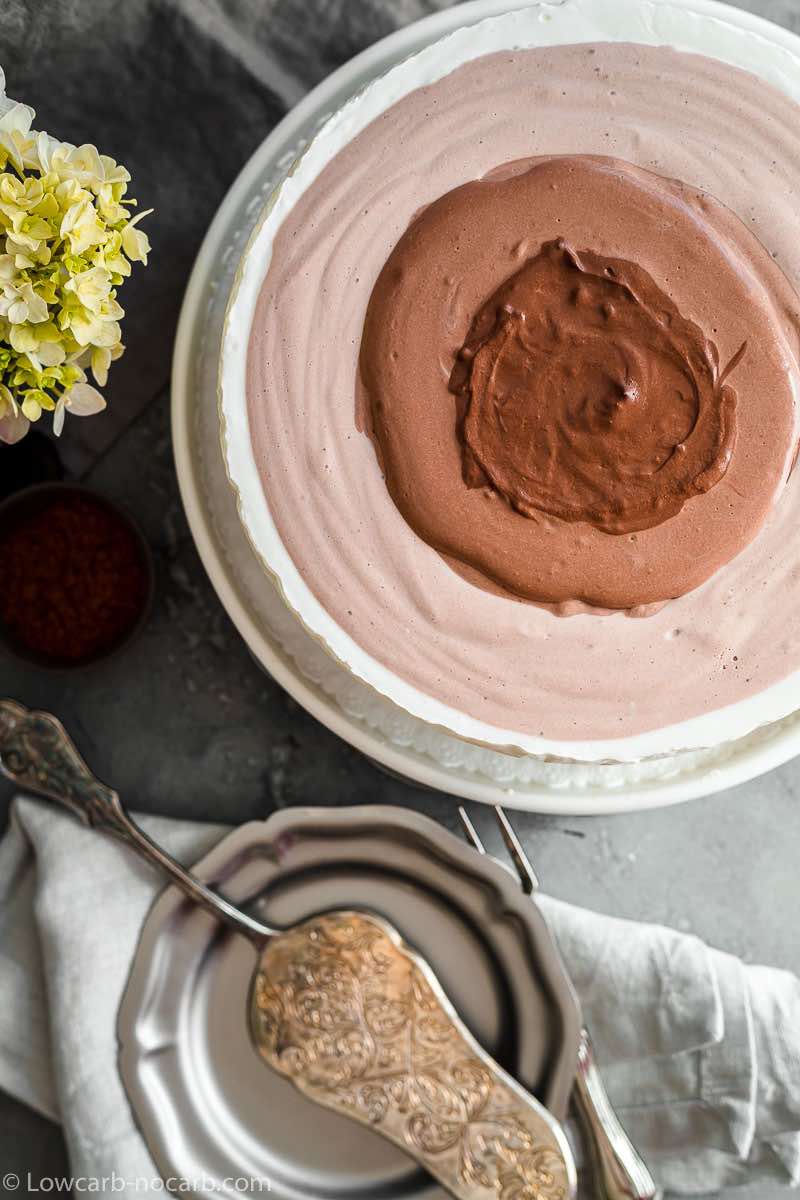
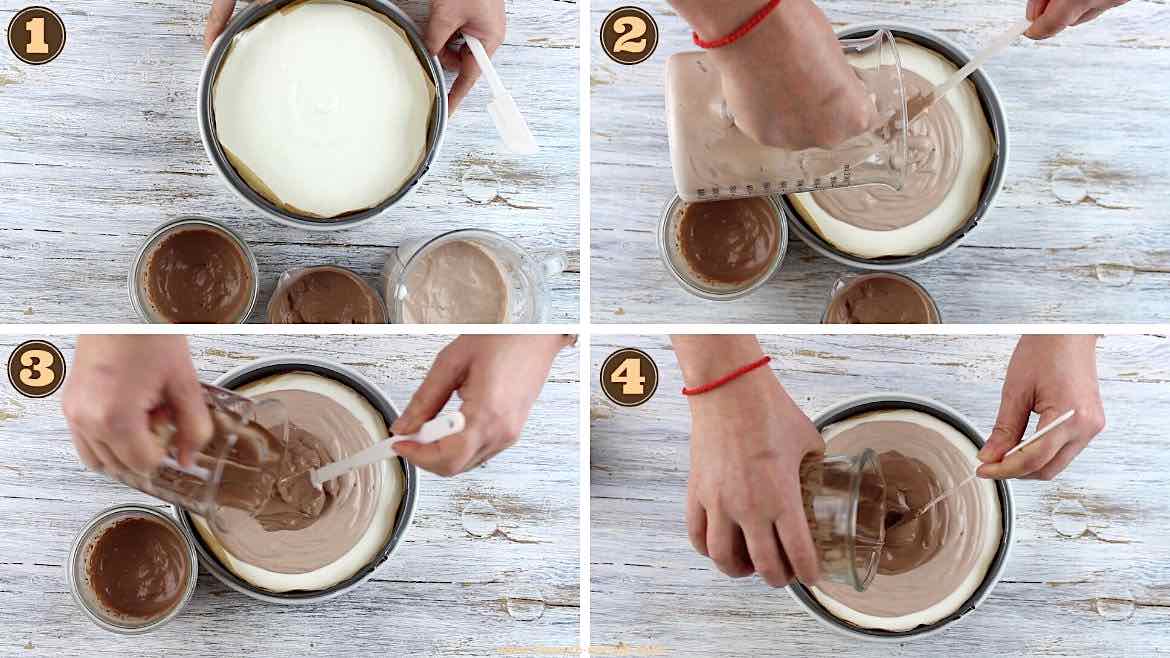
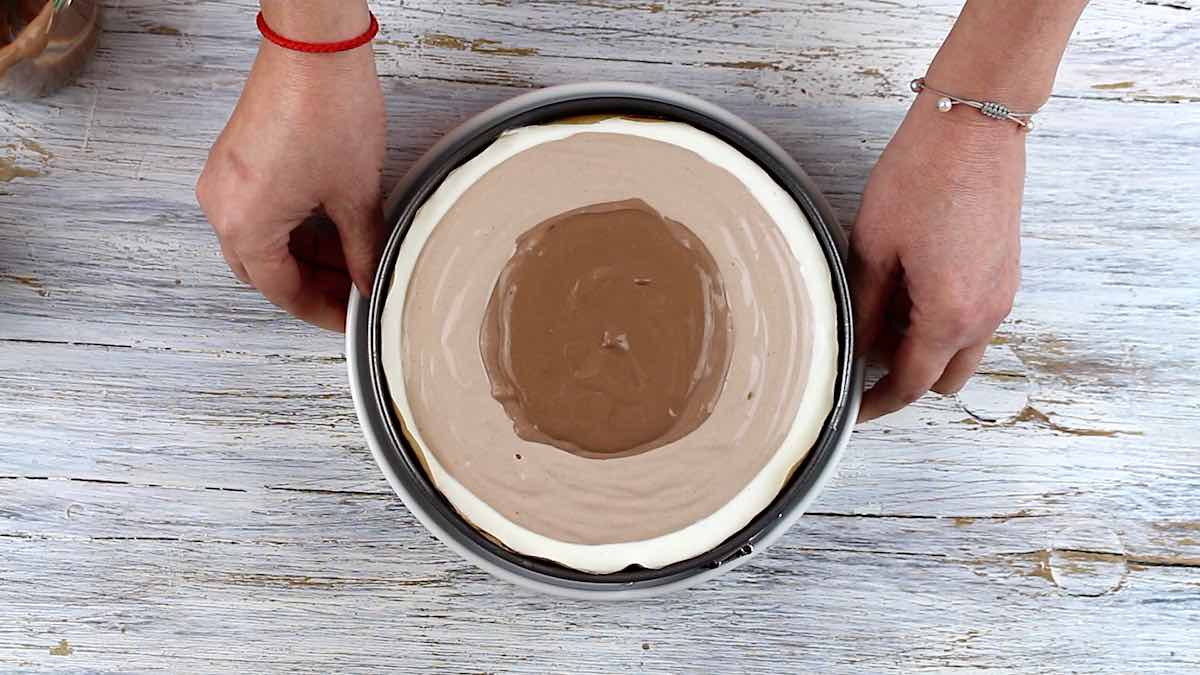
Eighth Step: Ripple Pouring
Once the jars are thoroughly mixed and you are satisfied with the colors, we can start pouring and making the ripple design.
Take the baking form with the white yogurt insight and start with the lightest brown color.
Pour it slowly on top of the white yogurt directly into the middle. Do not shake or touch or move. Just pour all the mixture into the center.
Once the first mixture is poured, take the second one and start pouring again into the middle of the baking form.
Follow the last step the same way and pour the darkest brown into the middle.
In this step, the last parts are getting too thick to pour. Place it into the microwave for a few seconds, and the mixture should liquidize again.
Ninth Step: Bang and Chill
To help the bubbles disappear and let the cake set a bit, slightly bang the whole cake against the table. Make sure the colors will not mix. Check the video for a better understanding.
Gently lift from the table and refrigerate the cheesecake to cool down for at least 5 to 8 hours, best overnight.
TIPS AND TRICKS TO MAKE THIS RECIPE:
- Cake Form – My calculations started with the cake form I used. Because the only medium-sized baking form I had was the one that fits into our 6-inch Instant Pot, that is the one I have used. You can use any other baking dish you have. If wider, your cake will be with a bit less height, but still awesome.
- Video Recipe – If there are some steps you are unsure of, please check our video instructions for better understanding.
- Thickening – If you realize your mixture is already getting thick and challenging to pour, place it into the microwave for a few seconds, and it will liquidize again.
- Coloring – If by any chance two of the colors are very similar, add a bit more yogurt to make it lighter or add more cocoa to make it darker, so all three shades look different brown.
- Dairy Free – You can swap heavy cream with coconut cream and yogurt with coconut or almond yogurt.
FREQUENTLY ASKED QUESTIONS AND ANSWERS
No-Bake Keto Cheesecake Recipe Math
Do you love Math? Not? Me neither.
Here you need just a tidbit of calculation, a bit of measurement.
But …. A BIG BUT
No Worries.
I have done that all for you.
All you need is to take the recipe and follow along.
But before that, let us get some facts.
How To Calculate Low Carb Ripple Cheesecake?
Ripple Cheesecake Calculations
I have measured how much yogurt I can fill the form with, considering extra for whipping cream.
That came to about 1,5 kg of yogurt.
So I have decided to go with 1400g of yogurt.
Now with the calculations, you have to make sure you have the most white color and the least dark brown.
- Yogurt S = Cocoa XL
- M = Cocoa L
- L = Cocoa M
- XL = Cocoa S
I will not bore you here with anything more, just the results explained below and in this homemade keto recipe.
Can You Make This Best No Bake Keto Cheesecake as a Single Serving?
You can prepare it as a single serve or cut the recipe in half for a smaller cake. I have even pre-calculated it for you.
Per our original recipe, I divided our cake into eight servings and made a single-serve beauty.
I have even tried it myself to make sure all of the measurements fit, and it is just perfect.
Ingredients you will need:
- 175g (¾ Cup) yogurt
- 20g ( 1,5 Tbsp) Heavy Cream
- 2 Sheets or 2g of Gelatine
- 6g Cocoa
- 1 tsp Vanilla Essence
I would divide it into three parts only, starting with the darkest one
- Dark Brown: 30g mixture + 4g Cocoa
- Light Brown: 70g mixture + 2g Cocoa
Follow the exact steps of our sugar-free cheesecake recipe. And let it sit in the refrigerator for a few hours.
Nutritional values for a single-serve would be as follows:
Carbs:3g, Fiber 1g, Protein: 8g, Fat: 6g
How Do You Store Easy No-Bake Cheesecake?
Once you take the whole cheesecake from the baking form after it has been set for 5 to 8 hours or overnight, you can place it on a serving plate. Keeping it on the same plate, you can store it in the refrigerator for 3 to 4 days without any problems.
Because of the gelatin, you do not have to be worried that the cake will break or get liquid. If you want to keep it longer, I suggest freezing it.
You can easily store this cake in the freezer. The best way is to wrap the whole cake in a plastic wrapper and either in aluminum foil or place it in a container that fits into your freezer.
If you plan to eat it as a single-serve, I suggest pre-cutting the whole cake in advance and wrapping each piece in plastic wrap. In that way, it will be much easier for you to take it out of the freezer and unfreeze only a piece or two you need on that day to prepare.
More Keto Dessert Recipes
- Blueberry bundt cake
- Red currant fluff
- Sugar-free marshmallows
- Chocolate zucchini cake
- Coconut ice cream
- Chocolate mascarpone cake
Pin For Later
Need Support or have Questions? Join our Free Facebook Group.
Follow us on Pinterest, Facebook, Instagram, TikTok, Flipboard, or YouTube.
For weekly New Recipes and a FREE E-Book get into our NEWSLETTER.
Full Recipe With Print Out Option
Thank you for giving us 5 stars
Chocolate Ripple No Bake Keto Cheesecake Recipe
Equipment
Ingredients
- 5 Cups Greek Yoghurt
- 12 Sheets Gelatine
- 2/3 Cup Heavy Cream
- 5 Tablespoons Cocoa
- 3/4 Cup Sweetener
- 2 teaspoons Vanilla Essence
Video
Instructions
- To make the cheesecake, prepare all ingredients in advance.
- Depending on the gelatine you will use, prepare it in advance. Heat your heavy cream on the stove or microwave and pour it into the jar you will mix with gelatine.
- Add gelatine or gelatine sheets into the jar, and mix it thoroughly with heavy cream with your hand blender.
- Place it on the side.
- To make the filling, take a big bowl filled with yogurt and add the sugar sweetener of your choice. Hand mix the powdered sugar into the yogurt first ( so it does not dust your whole kitchen) and switch on your hand mixer. Mix fully. Slowly add the heavy cream gelatine mixture to the yogurt and keep mixing. Ensure the mixture is not hot; otherwise, your yogurt will become very liquid.
- In this step, you can prepare three different jars big enough for your hand mixer to fit. If you will use the exact measurements of our yogurts, place 1,5 cups into the biggest jar—3/4 of a cup of yogurt into the second jar and half a cup into the smallest. Next to it, prepare a bowl with half a tablespoon of cocoa for the biggest jar, two tablespoons for the middle, and 2 1/2 tablespoons for the smallest jar.
- When all three of the jars are filled, pour the rest of the remaining yogurt mixture into your prepared baking form.
- Add cocoa inside each jar, and with your hand mixer, start mixing it. You should be able to whip up three different colors of brown. The biggest jar should have the lightest color, and the smallest one should have the darkest color.
- Once the jars are thoroughly mixed and you are satisfied with the colors, we can start pouring and making the ripple design. Take the baking form with the white yogurt insight and start with the lightest brown color. Pour it slowly on top of the white yogurt directly into the middle. Do not shake or touch or move. Just pour all the mixture into the center. Once the first mixture is poured, take the second one and start pouring again into the middle of the baking form. Follow the last step the same way and pour the darkest brown into the middle. In this step, the last parts are getting too thick to pour. Place it into the microwave for a few seconds, and the mixture should liquidize again.
- To help the bubbles disappear and let the cake set a bit, slightly bang the whole cake against the table. Make sure the colors will not mix. Check the video for a better understanding. Gently lift from the table and refrigerate the cheesecake to cool down for at least 5 to 8 hours, best overnight.
Notes
- Cake Form – My calculations started with the cake form I used. Because the only medium-sized baking form I had was the one that fits into our 6-inch Instant Pot, that is the one I have used. You can use any other baking dish you have. If wider, your cake will be with a bit less height, but still awesome.
- Video Recipe – If there are some steps you are unsure of, please check our video instructions for better understanding.
- Thickening – If you realize your mixture is already getting thick and challenging to pour, place it into the microwave for a few seconds, and it will liquidize again.
- Coloring – If by any chance two of the colors are very similar, add a bit more yogurt to make it lighter or add more cocoa to make it darker, so all three shades look different brown.
- Dairy Free – You can swap heavy cream with coconut cream and yogurt with coconut or almond yogurt.
Nutrition
Disclaimer
Please note that nutrient values are estimates only. Variations can occur due to product availability and manner of food preparation. Nutrition may vary based on methods of origin, preparation, freshness of ingredients, and other factors.
If you are still looking for some Low Carb products, visit our recommended site on Amazon, which we participate in as affiliates. Just click on the image below and all will be revealed.

Keto & Low Carb Recipes using Yogurt
All the fantastic recipes made with our homemade Keto Greek Yogurt, easily prepared using an Instant Pot.


Keto Desserts E-Book

Living a Keto Lifestyle but still, have a sweet tooth?
Explore 31 Days with Top Keto & Low Carb Dessert Recipes.
All new recipes never featured anywhere else.
The single portion cheesecake also contains same amount of gelatine (20g)? Also what temp should the heavy cream be boiled to?
Dear Nancy,
Thanks a lot for realizing that. One 0 has been added by mistake, probably after all of those millions of calculations I have made to make it as easy as possible for all of you. It is now repaired. Thanks a lot. It’s 2 sheets only.
This looks so ?. May I know if it’s possible to use gelatine powder instead?
You sure can Carolyn.
I am very interested in the Keto Ripple cake. Please advise the gelatin product & brand. Not familiar with any except beef gelatin in powder.
As I live in Europe, the gelatin Brands might be a bot different, but any brand should work great with this recipe.
Hi there. I just made this recipe for Christmas dinner dessert! I used homemade high cream yoghurt and subbed in 1/2 cup homemade ricotta cheese for some of the yoghurt just to lessen the tartness a little. I used powdered Allulose and I had to add more sweetener. It would have been fine for me but my husband has a sweeter tooth I added another 3/4 cup to taste. Also, just to liven things up I added 1/4 teaspoon cinnamon to the smallest pudding layer, a 1/4 teaspoon almond extract to the second biggest layer and a half teaspoon vanilla paste to the white layer. All the layers taste great but the bottom layer set before I could pour in the subsequent layers. So I just cut them in with a knife and we will have more of a swirl dessert than your pretty layers. We don’t have gelatin sheets here but Google told me it was a teaspoon of powered for every sheet so I used 12 teaspoons=4 tablespoons. I stirred this into the cream and it “froze” into a solid block. After softening it for a few minutes, I melted it in the microwave in 30 second shots and it smoothed out great and blended into the yoghurt perfectly. Such a great recipe as I tire of the cream cheese flavour in Keto recipes and usually have yoghurt on hand.
Merry Christmas,
Valerie
Dear Valerie,
What a great additions and ideas you came up with. I am sure the cake tasted outstanding, maybe even better than the original recipe. With regards the base getting set before pouring another layer, I have experience that once, when I was not fast enough and just placed it for a few seconds to the microwave and stirred fully. That softened it a bit and I could have continued with layering.But even a swirl cake looks wonderful. I guess you can not really go wrong with design in here.
I am not able to locate the video button. Also, what is the
instruction for “prepared cake form”. Also, what size cake dish is recommended?
My calculations started with the cake form I used. Because the only medium-sized baking form I had was the one that fits into our 6-inch Instant Pot, that is the one I have used. You can use any other baking dish you have. If wider, your cake will be with a bit less height, but still awesome.
With regards to video, I am just in the process of changing the recipe card into better version, but you can check the full video instruction on Youtube, where all of my recipes are in as well.
There is a photo in the blog that shows eggs are needed in this recipe, but no eggs in the recipe itself. There aren’t eggs because it is a no bake cheesecake, correct?
O my Kayla,
Thanks for spotting that. I have no idea how and why I have added eggs into the photo. You are right, no eggs are in this recipe. I will redo the photo and swap it. Thanks again for spotting this.